Enable Dot NET Framework On Windows 8
Almost Every Windows 8 User wants to Install .Net Framework on their system because of many software asks for .Net Framework. So this is a essential article for Windows 8 users. You dont need to download additional files to enable Dot Net Framework on Your Windows 8 Computer. Just follow the instructions given below.
Collecting Required Files to Enable .Net Framework 3.5 On Windows 8
Important Notes: You will need a virtually mounted iso file or a DVD Disk of Your Installed version of Windows 8. So if you dont have any iso file or disk then collect it first.- Load Windows 8 installation disk to virtual drive or physical DVD drive.
- Go to Loaded DVD Drive > sources.
- Find a folder named sxs and copy it to C Drive.

Install .Net Framework 3.5 On Windows 8 by Using CMD / Command Prompt
- Move the cursor to the bottom-left corner of the screen. Start button preview will appear.

- Press the Right Mouse Button. Click on Command Prompt (Admin). Click on Yes if it asks for any permission.
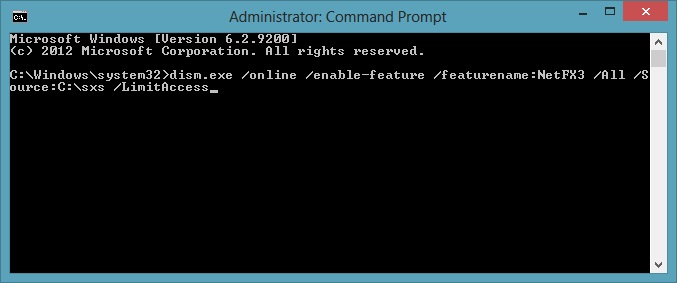
- Copy the following command. Then Right click on Command Prompt windows black area and click on Paste. And press Enter.
dism.exe /online /enable-feature /featurename:NetFX3 /All /Source:C:sxs /LimitAccess
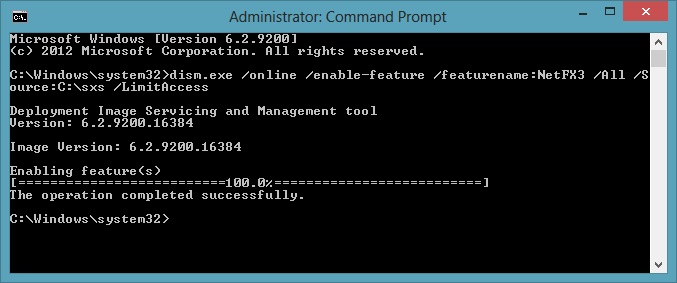
- It should start .net framework enabling process. Wait for a few seconds. It will show a windows like screenshot given below. Thats it. .Net Framework on your Windows 8 PC is now enabled.
If you are still unable to enable it successfully then comment below. One more thing you should use a user account with administrator access. But its not required only recommended.

